Thursday, February 2, 2012

New Project: American Flag quilted throw

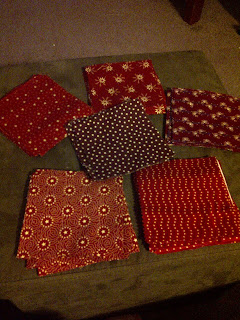
My fabric came in the mail today, and I started cutting the red squares for my next project, an American flag throw for my boyfriend. I am keeping it pretty simple, seeing as how my boyfriend doesn't like things complicated or "busy" looking. I went with Old Glory II fat quarter bundles, paired with a few scraps I had left over for some of the blue and white squares. I went with darker colors, to make it look more "country", and also to keep it toned down since it is for my boyfriend and he doesn't go for overly bright colors. Here is a sneak peek at the red squares I finished cutting tonight.
I ordered my fabric from Fat Quarter Shop, and I love their selection and their customer service. I'm already working on designing a Christmas quilt and plan to buy the fabrics for it from them as well. I highly recommend them to people who are looking to purchase precuts, or even just yardage.
 I'm still just starting out, and fat quarters are an easy way for me to build my "stash". I'm doing this one by hand as well, so it's going to be a long process, but I find sewing it by hand is soothing, and I feel more in control than when I use a machine. I definitely want to get more practice on a sewing machine, but the only one I have, which was my mother's Singer that is at least 35 years old isn't working. I've been meaning to take it to have someone look at it, and haven't found the time to, since I really dont have anywhere to put it right now anyway. I do want to get it fixed, just because there have been several quilts, older than I am pieced and quilted on that machine. It makes me think of my mom, and the fact that is one of the machines made from metal and not plastic is a testament to the fact that it has last 35 years. Anyway, that is all the cutting I've gotten done so far, and its time for me to hit the sheets. Once I've made some progress on the piecing I'll post more pictures.

Tuesday, January 31, 2012

Kindle Cover

My wonderful boyfriend bought me a Kindle for Christmas and I set out to make a cover for it so I could take it with me and not be afraid of breaking or scratching it. I started with 2 fat quarters of coordinating fabric, one for the outside and one for the lining and backing. And measured it so they were three times the width of my Kindle (the outside a little larger to overlap the edges while I quilted), and cut them out along with the batting.
I traced the outside of my Kindle onto a piece of fusible interfacing and an extra piece of the lining fabric, making sure the lining fabric had a 1/4 inch seam allowance all the way around the edges. I fused the interfacing onto the back of the lining fabric and then ironed down the seam allowance to give it a finished edge, and did a quick stitch around it to hold it down and attach the pieces of elastic at the corners to hold the Kindle in place.
I quilted straight lines along where the cover would fold and then attached the binding, which was just a purchased double fold binding. Then I attached pieces of velcro to the outside flaps to hold it closed, and done!

The inside, finished product.

Here is what the outside looks when it is folded and closed
The inside, you can see the pieces of velcro from this view


Here it is open with the Kindle inside.


Monday, January 30, 2012

My first project finished...

I started a quilt in October of 2010, and finally finished it! Its a queen size quilt, and completely by hand. All the piecing, quilting, binding, every single stitch by hand. And my hands certainly show it! I've caught the quilting and sewing bug. I absolutely love making something from scratch, the entire process intrigues me, from picking my fabrics to designing the pattern. Here are some pictures of the process from start to finish. I would have taken more if I had thought that I would become so addicted!

The block. For my first quilt I stayed with one block only.

Playing around with the layout, since it was my first quilt and I was worried about the points matching up I decided after looking at it this way that I needed sashing.
Here you can see it together, and you can see the hand quilting, I did outline quilting since this was my first time. I was worried after I was about half through because I had read that some quilters don't recommend outline quilting. I was worried that when it was all said and done I wouldn't be happy with it, but I think it turned out beautifully.

All quilted, and the backing and batting trimmed, and ready to put the binding on.

Finished! Here you can see the binding, I had thought about doing green or blue, but my boyfriend didn't want it to look like an "Easter egg" as he called it, and I'm actually glad I went with a neutral.


The Label I did with hand embroidery